How to use the Carousel to create a multi-page form?
In WYSIWYG Web Builder it is possible to use the Carousel as a form. This makes it easy to create multi-page forms.
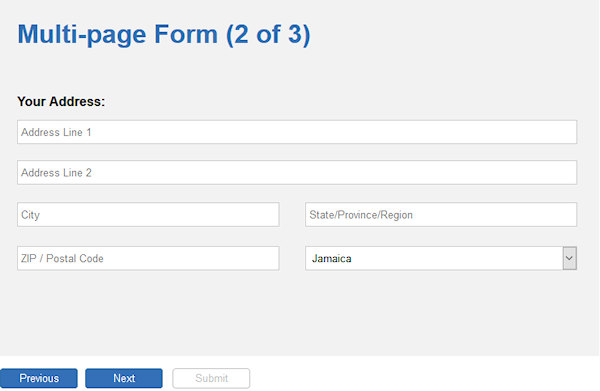
In this tutorial we will use the Carousel to create a multi-page form with wizard-like layout.
Note: Before starting with this tutorial, make sure you have read the other Carousel related tutorials to understand the basics.
In this tutorial we will use the Carousel to create a multi-page form with wizard-like layout.
Note: Before starting with this tutorial, make sure you have read the other Carousel related tutorials to understand the basics.
Step 1
Add the Carousel object to the page.
This demo uses external buttons to control the Carousel slide, so first lets disable the built-in navigation and pagination.
Add the Carousel object to the page.
This demo uses external buttons to control the Carousel slide, so first lets disable the built-in navigation and pagination.

Step 2
In the properties of the Carousel, check 'Enable Form' so it behaves like a form. In the Settings you can change the form's properties.
These are the same settings as a standard form so we will not get into details about that. The focus of this tutorial is on the multi-page layout of the form.
In the properties of the Carousel, check 'Enable Form' so it behaves like a form. In the Settings you can change the form's properties.
These are the same settings as a standard form so we will not get into details about that. The focus of this tutorial is on the multi-page layout of the form.

Step 3
Add 3 buttons below the Carousel to control the slides: Previous, Next and Submit (or Finish).
Add 3 buttons below the Carousel to control the slides: Previous, Next and Submit (or Finish).

Add an event to the Previous button: onclick -> Slideshow Previous -> Target: Carousel1

Add an event to the Next button: onclick -> Slideshow Next -> Target: Carousel1

Add an event to the Submit button: onclick -> JavaScript: document.getElementById("Carousel1").submit();
This makes the button a submit button for the Carousel/Form without being part of Carousel itself.
This makes the button a submit button for the Carousel/Form without being part of Carousel itself.

Step 4
To give the buttons a different appearance for when they are enabled/disabled, we can use Styles.
Open the Style Manager and create two new styles: btnEnabled, btnDisabled.
To give the buttons a different appearance for when they are enabled/disabled, we can use Styles.
Open the Style Manager and create two new styles: btnEnabled, btnDisabled.
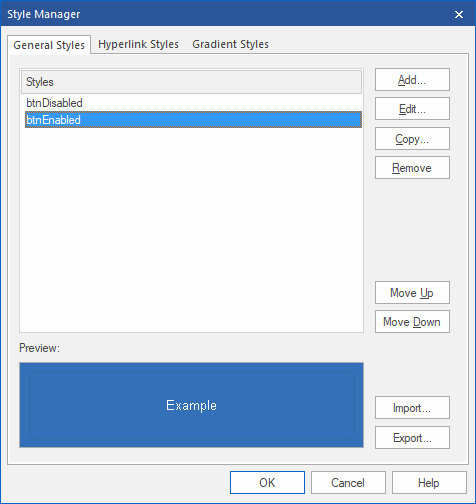
Style name: btnEnabled
background-color: #3370B7
border-color: #2E6DA4
border-style: solid
border-width: 1
font-family: Arial
font-size: 10
text-color: #FFFFFF
Style name: bntDisabled
background-color: #FFFFFF
border-color: #C0C0C0
border-style: solid
border-width: 1
font-family: Arial
font-size: 10
text-color: #C0C0C0
custom style: cursor: not-allowed; pointer-events: none;
Step 5
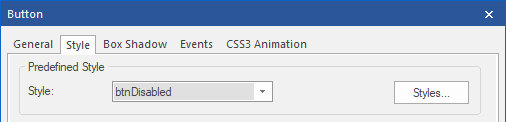
In the "Style' section of the buttons select 'btnDisabled' for all 3 buttons.
In the "Style' section of the buttons select 'btnDisabled' for all 3 buttons.
Step 6
Next we will dynamically enable/disable the buttons based on the current slide using Carousel Events.
Next we will dynamically enable/disable the buttons based on the current slide using Carousel Events.
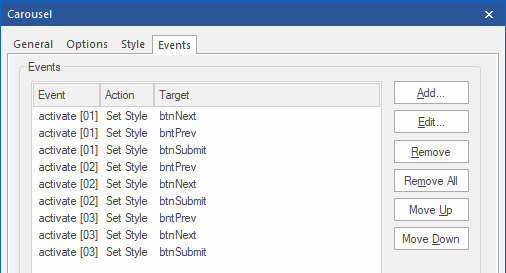
activate[01] - First slide
bntNext: SetStyle -> btnEnabled
btnPrevious and btnSubmit: SetStyle -> btnDisabled
activate[02] - Second slide
bntNext and btnPrevious: SetStyle -> btnEnabled
bntSubmit: SetStyle -> btnDisabled
activate[03] - Third slide
btnPrevious and btnSubmit: SetStyle -> btnEnabled
bntNext: SetStyle -> btnDisabled
Step 7
Finally we have to add some form controls for the user input, like editboxes, checkboxes etc.
For this demo we just added some random input fields...
Finally we have to add some form controls for the user input, like editboxes, checkboxes etc.
For this demo we just added some random input fields...